Japanese saws
Content
Expert knowledge - Japanese Saws

In Japan, woodcraft has a longstanding tradition. As long ago as 300 B.C., iron tools, such as axes, adzes, chisels and the first precursors of present-day planes, were already used for woodworking in Japan. The first saws were introduced only a short time later. Over nearly two millennia of wooden construction, these first saws have developed into fully refined highperformance tools. Even today, impressive palace and temple buildings, such as the Horyu-ji temple above built more than 1300 years ago, still attest to the highly developed state of early. Japanese wood craftsmanship.
As Europe’s largest supplier of Japanese handicraft tools with more than 20 years of experience, we have the highest quality standards for every Japanese saw that leaves our company.
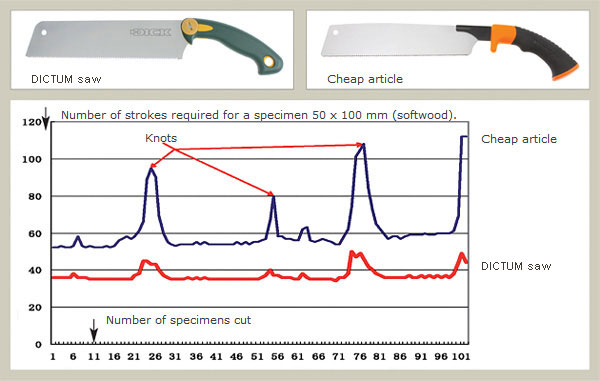
The saws that we offer are manufactured exclusively in the Japanese master blacksmiths’ workshops. Saws with interchangeable blades are manufactured on highprecision machines and saws with permanent blades in traditional small workshops. The quality of these tools fundamentally differs in many respects from inexpensive Chinese or Taiwanese imports which sometimes have a similar appearance. More than 20 testing processes during manufacture (e.g. the microscopic final inspection of every saw blade or the manual sawing test of each individual Dozuki blade) are followed by a 100% ceck of incoming goods in our company.
You purchase a top product guaranteed to be 100% fault-free! And our responsibility doesn’t end with selling the saw. The supply of replacement parts is also ensured over the long term..

- Finest steel quality
- Impulse-hardened tooth-by-tooth (every saw tooth has the same hardness, therefore the saw stays sharper for longer)
- Replacement blade service
- Quality control at the warehouse in Plattling
- Uniform and exactly symmetrical tooth setting (no drifting)
- Proof of origin
- Tool handles without toxins (all plastic handles are regularly tested)

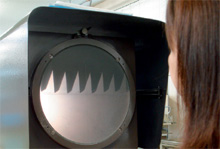 Tooth checking by microscope
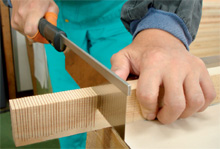 Saw test
 Quality control at Dictum
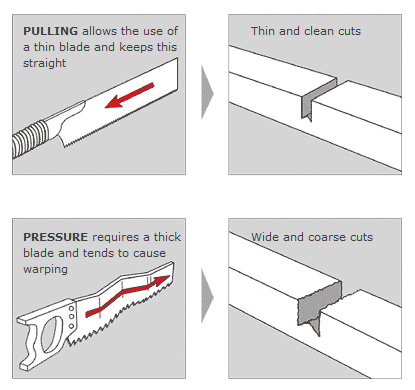
Conventional saws are pushed. This requires thick blades in order to ensure sufficient stability. Japanese saws, on the other hand, are pulled, allowing the use of very thin blades, as they are only subjected to tensile stress and cannot warp. The saw kerfs are therefore finer and the required sawing forces considerably lower.
- Trapezoidal teeth (crosscut teeth)

Preferred for cuts across the grain. The teeth are sharpened on three sides in alternating fashion to cleanly sever the wood fibres with razor-blade sharpness, leaving very clean surfaces.
- Triangular teeth (rip teeth)
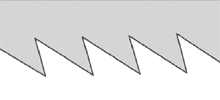
For sawing along the grain (ripping). The tooth sizes vary over the saw’s length to make it easier to start cuts and improve cutting efficiency.
- Universal teeth
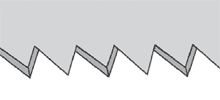
A hybrid form of the above tooth types, for sawing across, along, and diagonally to the grain.
The knife-sharp special teeth produce clean working surfaces, which normally no longer have to be cleaned out with a chisel or smoothed with a plane.
Result:- You save time.
- Even with fibrous soft wood, the cutting edges do not tear out.
The result is visually more satisfying.
- Dozuki

Universal saw with reinforced back and therefore limited cutting depth. For precise, thin cuts and fine surfaces.
- Kataba

The Kataba is a sturdy saw without reinforced back for deep, long cuts.
- Ryoba

The Ryoba is a double-sided saw with trapezoidal crosscut teeth on one side and triangular rip teeth on the other. The optimum sawing performance is therefore available for sawing both across and along the grain.
- Sawing technique
Saw with less force and even strokes, using around 2/3 of the blade length. The saw “bites” under its own weight because of the unique design of the teeth. The lower the force exerted, the better the result. During sawing, change the cutting angle (arching stroke). This improves the saw’s performance and the teeth remain free.
- Angle
For sawing out mortises or dovetails, firstly set the saw at a flat angle and saw along the marking. Only then, tip the saw increasingly towards the right-angle position and saw down to the ground.
- Marking
For precise cutting, use a marking knife instead of a pencil. Approach with the saw so that the line just barely remains.
- Which size of saw?
Rule of thumb: The length of the saw blade should be at least double the length to be sawed (thickness of the workpiece).
- Chattering
If the saw does not cut smoothly, change the angle of attack (20°-90°) to the workpiece. Make certain that the workpiece lies on a solid support or is well clamped so as to be free of vibrations.
- Starting the cut
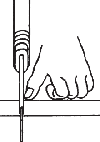
Use the rear section of the blade closest to the handle to start the cut and use the thumbnail as a guide. Begin sawing with short strokes.
- The right perspective
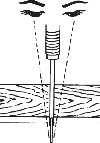
Guide the saw symmetrically through your field of vision, so that the line of sawing is within view of both eyes.
- Two-handed sawing
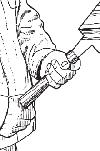
With larger workpieces, two-handed guidance is recommended, with the (right) pulling hand at the rear end of the handle and the (left) guiding hand close to the tang.
- Rip cuts
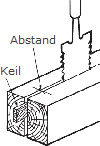
Drive a small wedge into the kerf to prevent the saw blade from getting jammed and to make cutting easier.
- Cross cuts
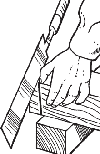
When you have made a shallow cut on the first side, rotate the piece away from you. This will improve guidance and cutting precision, especially for large cross-sections.
Aspart from the type (Dozuki, Kataba, Ryoba, Folding Saw), the intended use (wood, plated materials, plastic, metal) and the tooth patterns (for cutting across, along and diagonally to the grain), there are a further three criteria that are important for choosing the most suitable saw.
These distingushing features are:
- Blade thickness,
- setting and
- tooth spacing.
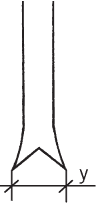
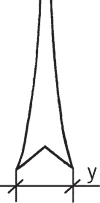
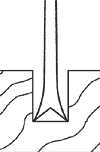
of the saw possible
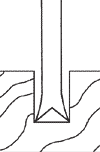
possible
- Blade thickness
The thinner the blade, the quicker and more energy-efficiently, the cuts can be made. Japanese saws are pull saws, therefore the blades can be manufactured thinner than those of traditional saws, since they are under tension.
The blade thickness of almost all saws is constant from the back of the saw down to the teeth, except for the Silky® saws and handcrafted saws. It is only possible to measure the blade thickness of these saws on the back, as they have hollow grinding.
- Setting
The setting affects the possibility of adjusting the saw cut as well as the acuteness of the cut surface and the necessary effort.
Setting describes the bending of the saw teeth alternating to the right and left side. Where the setting is measured is not defined clearly. For easier understanding we specify the setting by the thickness of the saw blade at its teeth. This dimension also corresponds to the width of the saw kerf. Usually all blades are set, except on the above-mentioned Silky® saws, handcrafted (with little setting) and flushcutting saws. The setting of the teeth allows precise cuts without the side of the blade being in contact with the groove. With no setting, the friction would be too intense, which would result in too much effort during sawing. The blades of the Silky® saws and handmade saws are ground hollow or hollowed out by great effort. This enables extremely clean cuts and small saw kerfs.
Using the dimensions of the setting and blade thickness, you will get a measurement which indicates the possible correction of the saw direction of the blade and the cleanliness of the surface. Just deduct the dimensions of the blade thickness from the setting. If this dimension is between 0.15 and 0.35mm the direction of the cut is slightly adjustable. Saws to be used for wet and green wood or rough cuts should have a dimension of between 0.15 and 0.35 mm.
Adjusting the cut with saws with dimensions of 0.1 and 0.15 mm is more difficult, but once the cut is made precisely, you do not have to readjust it. The calculated dimension is also essential for the surface. The higher the number, the more grooves will occur on the surface. You will also need less power for cutting. A smaller dimension will result in very clean surfaces.
Important:Setting - Blade thickness = between 0.15 and 0.35 mm
- Easy adjustment of the saw cut
- Less strain needed
Setting - Blade thickness = between 0.1 and 0.15 mm
- Saw makes straight cuts without adjusting the direction
- Extremely clean surfaces
- Tooth spacing
You can tell from the tooth spacing how fast the saw will cut (feed) and how fine the cross-section will be.
The larger the tooth spacing, the more material you can take out of the groove and the faster the saw cuts. Saws with large tooth spacing leave a lessclean surface, as only a few teeth cut the surface. A small tooth spacing enables clean surfaces, as many teeth cut the surface. The teeth are smaller but cannot cut as deep per cut and thus, because of their smaller chip spaces, cannot remove as much material, as saws with large tooth spacing.
SummaryTooth spacing between 1.5 and 3.5 mm (trapezoid toothing and universal tooth pattern) Tooth spacing between 4 and 5 mm (triangular tooth pattern)
- You will easily reach the cut end
- Slightly coarse cuts
Tooth spacing between 1 and 1.5 mm (trapezoid toothing and universal tooth pattern) Tooth spacing between 3 and 4mm (triangular tooth pattern)
- Extremely clean cuts
- Slightly inferior cutting performance (feed)
The tooth spacing is measured from one tooth tip to another. In our printed catalogue this dimension is always indicated next to the kind of tooth pattern (e.g. triangular tooth pattern 1.5 mm).
